
Note: This entry is part of my Halloween Projects category. You can see all of my posts documenting my projects by clicking the “Halloween Projects category” link above. You’ll also find images and movies of the projects and their construction in my Halloween Gallery, which can be accessed by links in these posts or directly here.
Welcome to Halloween 2006, friends. Starting this year, I’ve decided to better document the creation and function of the Halloween props/projects I so dearly love to create yearly. I wish I’d done this in year’s past, but in lieu of inventing a time machine to remedy that I’ve tried to tag as many past-project related entries into my new Halloween Projects category (linked above). Beginning this year though, each project will have it’s own entry describing the idea and construction, and hopefully documenting the final working product. Let’s begin then with Project #1 of an ambitious two-project year: Baying Wolves 2006.
Concept:
Credit where credit is due, my friend Kristi came up with this prop concept – and I did some “imagineering” to come up with a proposed implementation. The idea is simple: a faux setting moon with animated wolves baying in silhouette. Picture a ~7ft tall illuminated circle (like a partially set full moon on the horizon) silhouetting a couple wolves whose heads move up and down as piercing howls split the night. Yeah, that’s my best sellup of this prop folks, I’ll let the pictures and effect do the rest of the convincing. First, let’s outline the concept and we’ll get to the numbers and instructions later:

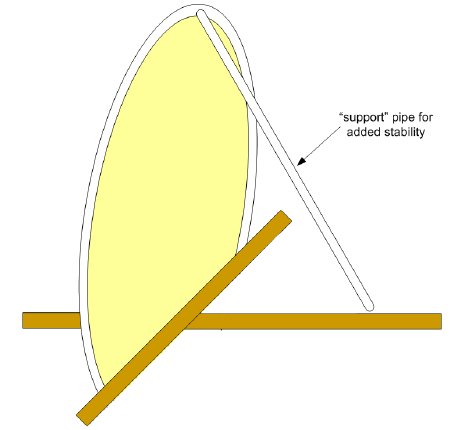
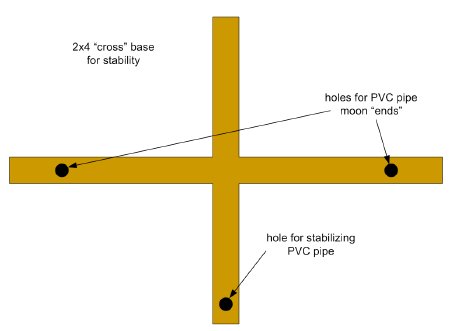

Well, that’s the basic concept. All I need are a motor, some materials, and some traceable wolf silhouettes. Read on for my documentation of the actual construction.
Implementation & Actuals
Coming soon, stay tuned.
Finished Effect
Coming soon, stay tuned.
Also written on this day...
- what sucks about android - 2010
- a pleasant turnaround - 2008
- choke on this silver spoon - 2006
- wheelchair love is cool and all - 2005
Wassup with Erie Eric! Just Kidding man.. It looks like me huh?
good idea but your basic concept is flawed. placing the wolf shapes close to the sheet will not give the desired effect if silhouettes are what you want. it will just light up the wolf shape directly. you should experiment with the size of the wolf shapes (smaller), distance from sheet and light source and the angle of the light source..think of the late afternoon shadows when you were a kid or when you made hand puppets in front of the projector at school.
maybe you should consult a designer ;-P