| |
| Hindsight is 20/20 : Power Considerations |
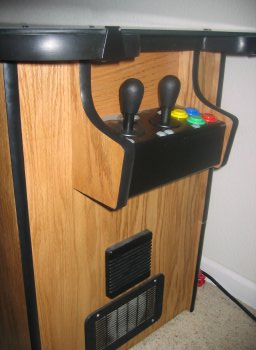
There are some things you just don't think about while making the machine. When I originally built the cabinet, I wired the
motherboard's power switch to a "hidden" pushbutton on the bottom of the cabinet - originally thinking I could use that button
to turn the machine off and on. What I didn't consider was the powering on and off of the other components, the monitor and
speakers.
See, the hybrid monitor from Happ doesn't have a power switch like a normal PC monitor. To turn it on, you plug it in; to turn
it off, well, you unplug it. This presents a small problem, because unless you want to monitor to stay on all the time, the
machine has to be unplugged after each time you use it - which can get annoying. Too bad the monitor doesn't support some
"auto-off" function like most PC monitors, where it will actually "sleep" after a period of inactivity. The speakers present a
similar problem, being that their power switch is inside the cabinet.
Originally in my cabinet, I hooked everything to a power strip. The power strip implementation presents some slight (but
annoying) problems. However, with my strip solution and a neat BIOS trick, I was able to make the machine power on and boot by
plugging it in. I then wrote a batch file that shutdown Windows and the PC
after a user exited ArcadeOS, at which point I would have to manually unplug the cabinet to power down the monitor and
speakers. With everything plugged into the power strip, when the computer shuts down - the monitor and speakers are still on.
When I'm done playing with the cabinet - I have to unplug it. It wasn't the best solution, but it worked.
When I discovered that my switch wasn't going to cut it, I considered building one of the many
relay solutions which other MAME cabinet owners have had
success with, but never actually got around to it. I lived with my cabinet for nearly a year in this state. That's when a
very kind reader of these pages sent me a simple and elegant solution.
The Smart Strip is a "current actuated"
power strip. That means it has three types of plugs on it. One of the plugs is monitored for current consumption, six of the
plugs are switched based on the monitored plug's state, and three plugs are "always on." Plug the computer's power supply into
the "control" plug, and when it shuts down it's current draw drops off - which cuts the power from the six switched plugs, where any additional cabinet ingredients are powered. So now my monitor and speakers are switched off when the computer shuts down, effectively making the motherboard's power switch a "cabinet shutdown" switch.
The Smart Strip runs about $30, and is (in my opinion) a more elegant solution than building an equivalent relay. I
like it because it's off-the-shelf and solved my problem instantly and easily. If you think it might be the solution you're
after for your cabinet, check the costs page for more info on where to pick one up.
|
| |
| Build Your Own Cocktail Timeline |
|
So, you wanna build a cocktail cabinet eh? Well, that's great! I can tell you
that you're gonna have a lot of fun, and some challenges too. I've put together this
quick "timeline" to help you plan. I know I would've appreciated something like this
when I was starting out. Let me know if this helps you at all - and if you've got
any suggestions, send 'em along and I'll do my best to work them in.
|
| Step
| Considerations
|
| Plan, Plan, Plan |
Think about what you want. Make sure a cocktail cabinet is right for you. Remember you're limited
to vertical games, and can only play 2-player "take turn" type games. Think about what games you want to
play: do you need 4-way and/or 8-way joys? What kind and how many buttons do you need?
Consider display options. What kind of monitor will you be using? Remember that the type of
monitor you plan to use often drives everything, from the cabinet design you can fit in, to the PC
hardware you may need.
Consider cabinet options. Do you plan to build your own cabinet? Order a pre-built one?
You have an existing cab you're planning to use? Whatever you go with, make sure it can accommodate your
display solution (PC monitor, arcade monitor, hybrid, TV), and the PC hardware that will run the show.
What about the guts? We need a PC to run this beast. Think about what you have around, or what
you're willing to spend. MAME is not an intensive application, so you don't need massive PC horsepower to
have a successful MAME machine. More important than computing muscle is your graphics capability. What you
need here will, in part, be dictated by the monitor solution you chose. Check the rest of this site for some
pitfalls that I ran into with my choice of graphics solutions. Also mind things like hard disk size, mounting
options, cooling, and any other peripherals (wireless LAN, cd-rom, floppy, etc.)
Decide on a preliminary budget. I know this part stinks, but what are you willing to spend? After
you've decided on monitor, cabinet, and PC (the major costs of the project), you can safely begin pricing
out all the other parts. Feel free to use my costs page to get a rough idea of what you may be spending.
Think about the control panels. Can you fit what you need in there? How do you want to lay it all
out? Think about ease of play and feasibility. If you're like me, draw out some button/joy configurations and
ask some friends what they think. Take into account the size limitations of your control panel and the keepouts
for all your control elements. Make sure everything you want can be mounted, wired, and actually used.
Controls to PC: Do you need an IPAC?, how many inputs?, USB or PS2? Maybe a JPAC if you're
converting over from an original cab with some reuse of existing parts? Any special considerations for
trackballs or rotary joys? Any JAMMA conversion items?
|
| Amass Materials |
Order your monitor, controls and buttons, IPAC/JPAC/etc., and any artwork and misc. parts you'll need (check the
itemized parts list page to see what all goes into it). If you're going to be "fitting" some cocktail underlay artwork to your cabinet - and you plan to use arcadedepot.com
as the cabinet source, I would recommend waiting to order the cabinet until you can send along your actual
underlay artwork for a custom cabinet top fit.
Assemble the PC. This is a good starting point, as you can do this while waiting for your ordered
materials to come in. You'll need to get all the needed software: MAME, ArcadeOS (or other frontend), ROMs,
drivers for your hardware, OS, and any other apps/files you want. Go ahead and build the drive and get it
working, play around with MAME and configure things - get used to the commands and navigation of your
frontend, etc.
If it's possible, test your monitor and controls. This may be too much trouble to go through for a test,
but it's really nice to know that everything is functional before you put it all together and press "go" for the
first time.
Check out your glass options. Call some local glass shops, and ask what they charge. To get the
perfect cut piece of glass, it's best to loan out your cabinet top for the shop to use as a template. So in my case
I had to wait on the underlay artwork to get the perfect cabinet top cut, and then wait on that cabinet top to get
the perfect glass cut. You situation may vary, but if you're following my lead - you'll also run into this waiting
game.
|
| Assemble |
As your parts start coming in and your PC is ready to go, you really have to start with the cabinet assembly.
Either follow the instructions from arcadedepot.com, get to sawin' if you're a DIY type person, or relax and go to
the next step if you were lucky enough to already have a cab (or bought a pre-assembled one). If you are assembling
your own, make sure you take your time and don't sacrifice quality for speed. I know you can see it coming together
now - but greatness takes time!
While the cabinet is being completed, you can start work on mounting your controls in whatever control
panel solution you went with. Custom control panels? You better start thinking about drilling and placement. Old
school or repro control panels? You have an easier go. At this point you can also start wiring up buttons and joys,
leaving plenty of lead length in your wire for later. This is a tedious task, so don't underestimate the time it
takes to wire all this up.
With the cabinet assembled, work on fitting your motherboard/PC inside. Whether you're mounting an entire
chassis or just bare board, make sure you account for some airflow. Most likely you'll need some fans in the cabinet
itself to circulate cool air and keep the internals at a safe temp. "Dry fit" all the parts first, making sure
that you can fit them all in without and obstructions (watch out for coindoor and monitor or CRT gun clearance).
Once you've made sure all your pieces fit, it's time to start securing things. I recommend doing the
monitor mounting last (but that's because I used the "shelf-mount" monitor from Happ, your display solution may
require special attention from the get go). Get your PC hardware secured, speakers, IPAC, etc. Run your wires
neatly and start hooking things up.
At this point you should have an assembled, working cabinet. Test your controls in this "real world"
environment. Make sure your OS and MAME setup is working now that we've planted it in the cabinet. Monitor the temp
inside the cabinet and watch for potential overheating situations. Play some games and make sure everything works and
is configured to your liking.
|
| Aesthetics |
Now it's time to make it all look nice! Put down any underlay artwork you might have, clip down your nice
new glass (clean both sides before you screw it down!). Make sure you've blown any dust/dirt out of the display
and bezel area, and wiped the monitor glass with Windex.
If you haven't done it already, optimize BIOS and Windows boot delays so you can get into the games
as fast as possible. Now it's time to tinker with Windows startup screens (replacing them with cool MAME logos,
etc.), change any boot sounds, etc. Basically you want to be as happy with your finished product as possible.
|
| Maintenance |
MAME & ArcadeOS: If you're daring, you can try and keep up with the latest versions of MAME and ArcadeOS, and
the latest ROMsets. To be honest, I tend to be in the "if it ain't broke, don't fix it" camp. But it's personal
preference.
Consider making a backup of your "golden" hard drive configuration. I used Symantec's Ghost to make a
restorable image of my MAME system once it was 100% setup and working. That way, if my hard drive fails - I can
create a backup from the image and be up and running again with a new drive in no time.
I know I've said it a million times, but pay attention to the temperatures in the cabinet. Too hot
means less life from your new machine. If it's heating up in there, install some fans to circulate the air. You'll
be glad you did.
|