

Warning, this is likely going to be a very boring entry for some, since I talk mainly about a home-improvement project I’ve been working on. However, when I stared writing about it – the words just kept coming, so I think it’s a good topic.
Saturday I started feeling odd, that sensitive-skin achy-chill feeling I get at the onset of a fever. Ignoring the obvious signs, Sharaun and I headed over to Pat and Cynthia’s place for a good ol’ fashioned because-it’s-summer drinkin’, swimmin’, and eatin’ party. I felt good throughout the soirée, my pre-fever feelings either ignored or temporarily gone. Later, Sharaun and I were the first to leave, as she was feeling pretty tired. As soon as I got home, the fever feeling came back. And now it’s Sunday afternoon and I’m laid up. A fever of 102 accompanied by a raging sore throat. I’m glad I wrote this before I started feeling crappy.
You don’t know how many times I’ve gone out in the backyard to “finish” the pavers/porch. I’ve been at this “almost done” phase for a long time now. I’ll be honest, I’m not finished because the project has bested me mentally, it’s presented me with it’s final challenge… and I’m convinced I will not be able to finish until I’ve proven myself its intellectual equal. Yes, this is an inanimate porch made of bricks we’re talking about, but it’s had me stumped for months now. I’ve been wracking my brain over how to solve the problem, and just don’t know what to do. This morning, for instance, I went out and stared the thing down again. I took some measurements, kicked around the same two or three ideas I’ve had since I discovered I was in a jam, and then drove up to Lowes in another futile attempt to find something that would work. What, you ask, has been able to keep me so beat-down? I’ll tell you. But first, you may need a crash-course in paver installation.
Pavers are just bricks, that’s easy. To “install” them, you first mark off the intended area, usually by setting up a border of bender-board or special paver-retention border. You then lay down a bed of base material within the border, usually gravel. Then, on top of the base, you lay down a layer of finer sand as a secondary base. In my case, I skipped the gravel+sand combo and went with decompose granite as a single base material (you could argue that DG is a lot like sand+gravel anyway, and it packs as solid as cement if you wet it a little). Anyway, after laying the base, you then level the entire area, ensuring that you’ve got the proper slope away from the house for drainage. After leveling, you just lay out the bricks like a puzzle, cutting in the edges with a stone saw. Once all the pavers are laid, you make a pass over them with a plate compactor. Now compacted, you brush sand over the entire thing and make another pass with the compactor. Finally, once the things are compacted and set with sand in the cracks, you brush a layer of “finishing” sand over the thing, which can be bought colored to offset the stones and make the whole thing look awesome. As an optional step, you can paint the entire thing with a sealer to bring out the color of the stones and protect them from the elements.
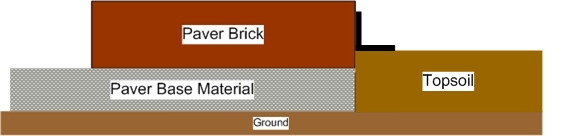
Man, that was boring, right? For the most part, I followed those steps. I’m at the point now where I’ve got my pavers all laid out, nice and level (well, OK, pretty dang level for a 1st-timer DIY job), and ready to be plate compacted and sealed. However, I’ve got one tiny problem… my retention border. See, when I began the porch, I marked off my area with neon orange marker paint, and then installed a border of bender-board held in place with stakes. I filled in this outline with DG, and set to leveling. After leveling, the bricks were cut and laid, and now you’d think I’d be ready to compact and we’d be done. But no… I’m not. Why? Because my border is not right. In some places, the height of the base material plus paver stone is more than 6″ off the ground – with the bender-board just high enough to retain the base. What I don’t know is, how to make sure that the stones stay in place – what border to use? Maybe it will help to see it (this is how obsessed with this problem I am):

See what I’m saying? They don’t sell paver border that’s taller than about 2″, and my pavers are set much higher than that in some areas. I’ll admit, I’ve tried to solve this thing several ways. I could “build up” the ground outside the pavers, so the border would then be tall enough to hold them in place. My problem with this though, is that I think a built-up “artificial” ground level outside the pavers wouldn’t be “strong” enough to hold the border down (you “nail” it into the ground with large metal nails/stakes). I’m going to have to bring in an inch or more of topsoil over the entire yard anyway… so maybe that’s the best idea. But I still doubt that hammering stakes into newly laid topsoil will give me as sturdy a hold as I need.
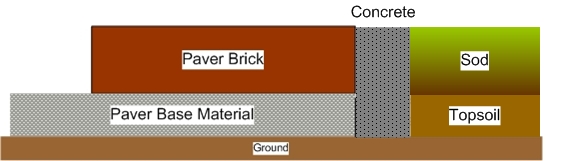
Then again, I know someone who also did his own pavers, and his solution for this problem was to pour a 4″ concrete border around the entire installation. It’s a brilliant idea really, and it actually adds a nice decorative touch to the installation because the sometimes imperfect-cut curves of the paver line are masked by the smooth curved edges of the concrete. Plus, you can do a colored concrete border that nicely offsets the stone color if you want to get really fancy. If I did that, the base+paver height off the ground would be irrelevant – since I can pour as high as I want. To be honest, this is the route I’ve been leaning towards. My buddy did it with nothing more than bags of cement, a wheelbarrow to mix it in, and a smoothing trowel. I’d have to setup the forms around the porch, but that’s not too big a deal.
Well, there’s my quandry… and I still haven’t moved on either idea. I guess that’s because I know, before I can even start down either path, that I have to go around the porch edge and move all the sprinkler heads back a few inches. See, in another novice mistake, I brought the sprinklers right to the edge of my porch border, and they are now too close – and won’t allow any kind of retention. So, I have to dig them all up, cut them back, and reattach all the heads. Ughh….
Also this weekend, I learned that my keygen’d version of Windows XP will no longer do Windows Update (and before you ask, yes – I am aware of the javascript hack to get around this). The point is, some months back, I actually bought a legit copy of XP Pro and had planned on making my previously hacked version legit with it. Come to discover that my hacked version is the volume license version, and I can’t just change the key to a Pro key. Not wanting to re-install Windows, I figured that as long as I actually owned a legit version my conscious would be at ease. Then, I’m locked out of Windows Update. So… time to fix this. I did a repair install of my legit XP Pro over the top of my pirated XP VLK (but not before doing a complete system backup first, I’ve learned my lesson). Worked like a charm.
Goodnight.
Also written on this day...
- life.next - 2018
- i even got to chuck a chick - 2007
- please make a daily call soon - 2006
I say go with the concrete. It’s strong, easy to make it into what you want, and it will make sure that your pavers will always stay in place no matter what. I’ve seen pavers done by a lot of people to see the ones on the edges crack off or fall off because there is no supposrt on the side. Just make sure your pavers are in the exact position you want before you lay down the ‘crete! Good luck!
your base material should extend past your paver surface. If it did you could install the edge restraint on top of the base, and it will be of suffient height to hold your pavers. Your base should extend at least 4-inches past your edge.
Peace,
PaverMaster